Tuesday, 26 July 2022

Chocolate Cupcakes with Peppermint Cream Cheese Frosting

Fudgy chocolate cupcakes with a smooth, cool peppermint cream cheese frosting, drizzled with chocolate and studded with crushed peppermint candy on top.


3/4 cup + 2 tablespoons (105g) all-purpose flour
3/4 teaspoon baking soda
1/2 teaspoon baking powder
1 cup (200g) granulated white sugar
1/4 cup + 2 tablespoons (30g) unsweetened cocoa powder
1/2 teaspoon salt
1/4 cup vegetable oil
1 large egg, room temperature
2 teaspoons vanilla extract
1/2 cup sour cream
1 teaspoon espresso powder or instant coffee granules
1/2 cup boiling water

Peppermint Cream Cheese Frosting:
1/4 cup (1/2 stick) unsalted butter, room temperature
4oz cream cheese, room temperature
1/4 teaspoon vanilla extract
1/8 teaspoon peppermint extract
2 cups confectioners’ sugar (powdered sugar), sifted

Topping:
1/2 cup semisweet chocolate chips, melted
Crushed peppermint candy for garnish

  • Preheat oven to 350 degrees F. 
  • Line a cupcake pan with baking cups.
  • In a large bowl, whisk together the flour, baking soda, baking powder,sugar, cocoa and salt. 
  • In a small bowl, whisk together oil, egg, vanilla and sour cream. 
  • Gently stir into dry ingredients, until just moistened. 
  • Dissolve instant espresso or coffee in the boiling water and stir into batter. 
  • Batter will be thin and liquidy. 
  • Distribute all of the batter between 14 baking cups, about 3 tablespoons batter per cupcake 
  • Bake for 16-18 minutes, or until an inserted toothpick comes out clean or with just a few moist crumbs. 
  • Cool completely on a wire rack before frosting.
  • For the Frosting:With an electric mixer, beat butter and cream cheese on medium speed until smooth
  • Add vanilla and peppermint until you reach your desired flavor. 
  • Gradually beat in powdered sugar until incorporated. 
  • Beat on medium speed for about 3 minutes, until smooth and creamy. 
  • Pipe onto cooled cupcakes.
  • For the Topping:Melt chocolate chips. 
  • Stir until smooth. 
  • Transfer to a plastic sandwich baggie, snip off the corner and drizzle on top of cupcakes. 
  • Garnish with crushed candy cane.

Recipe : Lindsay Ann Bakes

Monday, 25 July 2022

Eggnog Milk Shake

A yummy, creamy, dreamy eggnog shake! You can make this with or without a shot of rum, depending on who you’re mixing it for. Makes an awesome cocktail for the adults and a fun, sweet dessert for the kiddos!

for one eggnog shake:

3 large scoops vanilla ice cream
1 cup premium eggnog
1/4 teaspoon nutmeg
1 shot rum (optional) OR 1/4 teaspoon rum extract (for non-alcoholic version)
sweetened whipped cream for topping
sprinkles (or more nutmeg) for garnish

  • Place ice cream, eggnog, nutmeg, and rum/rum extract in the bowl of a blender.
  • Blend until smooth.
  • Pour into a tall glass.
  • Top with whipped cream and nutmeg/sprinkles.
  • Serve with a cute straw.
Recipe: Chin Deep

Sunday, 24 July 2022

Cranberry and Pear Pies

These cute and festive pies make a good warm dessert or a tangy alternative to mince pies


350g plain flour
85g ground almonds
140g caster sugar, plus extra to decorate
225g butter, chopped
1 egg, beaten

For the filling:
400g cranberries, fresh or frozen
50g caster sugar
25g cornflour
325g jar orange curd
450g just-ripe pears, peeled, cored and chopped

  • To make the almond pastry, tip the flour, almonds and sugar into a food processor
  • Pulse in the butter until the mixture resembles breadcrumbs. 
  • Pulse in up to 5 tbsp cold water until mixture comes together as a dough. 
  • Wrap in cling film and chill for 1 hr. 
  • To make the filling, tip the cranberries into a pan with the sugar and cornflour and stir well. 
  • Stir in the orange curd, then cook for a few mins until thickened. 
  • Add the pears and cook a few mins more, stirring frequently. Cool. 
  • Heat oven to 190C/170C fan/gas 5 with a large baking sheet inside. 
  • Roll out the pastry and use to line 8 x 10cm individual Yorkshire pudding tins or 10cm individual tart tins 
  • Spoon in the cooled filling. 
  • Roll out the rest of the dough and stamp out 4 x 9cm rounds to make lids. 
  • Cut out the centres with a medium star cutter. 
  • Carefully cover half the pies with the pastry lids and place the stars on a baking tray. 
  • Crimp the edges of each pie with your finger and thumb. 
  • Brush the pies and stars with the egg then dredge with sugar. 
  • Bake the stars for 8-10 mins and the pies for 15-20 mins until golden.
  • Dredge with more sugar once out of the oven. 
  • Place a star on the open pies and serve with cream or ice cream

Recipe : BBC Good Food 

Saturday, 23 July 2022

Fruity Candy Popcorn

AKA: Jello Popcorn! An unusual fruity concoction which is easy to make and sweet to eat
You can certainly eat this un-baked as well and it’s just soft and gooey, but definitely bake it if you’re going to pack it up for giving, or serve it as party food so it will be light and crunchy.

8 cups popped popcorn
1/4 C butter (that’s half a stick)
3 T light corn syrup (honey is a good substitute)
1/2 C sugar
1 3.5oz box jello, any flavor (not the sugar free kind)
  • Preheat oven to 300°F. 
  • Line a jelly roll pan with foil or parchment. 
  • If using foil, spray lightly with non-stick spray and set aside. 
  • Place popcorn in an extra large mixing bowl.
  • Place butter and syrup in a sauce pan on medium heat. 
  • Stir until butter is melted. 
  • Add sugar and Jello and stir to combine.
  • Increase heat and bring to a boil, then reduce heat so it just simmers. 
  • Continue simmering for 5 minutes.
  • After the sugar mixture simmers for 5 minutes, immediately pour over popcorn in bowl. Be careful, it’s super hot!! 
  • Mix right away and keep stirring so everything gets well coated. 
  • Spread mixture onto prepared pan and spread out evenly.
  • Pop in the oven and bake for about 10 minutes.
  • Remove the pan from the oven and let cool to room temp. 
  • Then break into pieces and enjoy! 

Friday, 22 July 2022

Chocolate Peppermint Bark

This chocolate peppermint bark is super quick and easy to make. Don't pay a fortune for it in stores! Just make your own.


8 ounces milk or semi-sweet chocolate
8 ounces white chocolate
1/4 cup crushed peppermints, small and large pieces

  • Line a cookie sheet with parchment paper. Set aside.
  • Fill two saucepans about 1/3 of the way full with water. 
  • Bring to a rolling boil, then lower the temperature a bit so it's a low boil. 
  • Place a heat safe glass bowl over top of each saucepan. 
  • Be sure the bottom of the bowl does not touch the top of the water.
  • Place one kind of chocolate in each of the two bowls. 
  • Keep the water hot so the chocolate can melt. 
  • Once each chocolate is smooth, spoon them alternately onto the cookie sheet
  • Continue to spoon onto the cookie sheet until all the chocolate is gone. 
  • Take a butter knife and drag it slowly though the colours to create the marble effect. 
  • Toss the peppermints over top. 
  • Place bark in the fridge for an hour or two to allow it to set up. 
  • Snap the pieces by hand, or cut with a knife.


Thursday, 21 July 2022

Decorated Santa Cookies

Break out your star-shaped cookie cutter—it’s just what you need to make decorated Santa cookies!


1 1/2 cups powdered sugar
1 cup unsalted butter softened
1 tsp pure vanilla extract
1 tsp almond extract
1 egg
3 cups flour
2 tsp baking powder
cookie cutter star-shaped

16 oz container white icing ready-made
red sugar crystals
1 tube black gel icing
18 - 20 candies cinnamon or red mini candy-coated chocolate
1/2 cup mini marshmallows

  • In a large mixing bowl, mix powdered sugar, butter, vanilla extract, almond extract and egg. 
  • Stir flour and baking powder together and add to wet ingredients. 
  • Mix until just combined then flatten the dough into a disc. 
  • Wrap the dough with plastic wrap and refrigerate for at least 1 hour.
  • Preheat oven to 375 degrees and line 2 cookie sheets with parchment paper. 
  • Unwrap the dough and roll out on a lightly floured surface about ¼" thick.
  • Cut as many stars as possible from the dough, dipping the cookie cutter in flour before cutting each cookie. 
  • Remove the scraps then transfer the stars onto prepared cookie sheets. 
  • Shape the scraps into a cohesive ball, add more dough then continue to roll and cut until no dough remains.
  • Prior to baking, bend one tip of each star over slightly to form Santa’s hat. 
  • Bake each batch of cookies 7–8 minutes then allow them to cool completely before decorating.
  • To decorate, coat the top of each cookie completely in white icing. 
  • Don’t worry about making it smooth—the more swoops and swirls the better! 
  • Sprinkle or dip the ‘hat’ in red sugar crystals, being careful not to get any on other areas. 
  • Use a butter knife to scrape the icing from a small area under the hat for Santa’s face.
  • Place 2 small dots of black gel icing in the area where the icing has been removed then place a red candy on the face to form a nose. 
  • Add a small dab of white icing to one side of a mini marshmallow and place it on the end of the hat to make a pom-pom. 
  • Repeat with all remaining cookies. 
  • Enjoy!

Wednesday, 20 July 2022

Almond Delight Macaroons

A cookie that combines Coconut, Almonds and Chocolate... my favourite sweet flavour combination. Delicious.

3 egg whites
1/2 cup granulated sugar
1/2 tsp almond extract
2 cups unsweetened desiccated medium coconut
1 tbsp all-purpose flour
16 dark chocolate–covered almonds
3 oz dark chocolate, melted
1/4 cup sliced almonds


  • In bowl, whisk together egg whites, sugar and almond extract 
  • Stir in coconut and flour. 
  • Let stand until liquid is absorbed, about 5 minutes.
  • Roll by heaping 1 tbsp into 16 balls. 
  • Press 1 chocolate-covered almond into centre of each 
  • Reshape mixture around almond to cover completely. 
  • Place, about 1 inch (2.5 cm) apart, on parchment paper–lined baking sheets. 
  • Bake in 300ºF (150ºC) oven until starting to brown on top for 20 to 25 minutes. 
  • Let cool on pan on rack.
  • Drizzle macaroons with melted chocolate. 
  • Overlap 3 almond slices on top of each. 
  • Refrigerate until chocolate is set, about 15 minutes.  
  • To Make-ahead: Layer between waxed paper in airtight container and freeze for up to 1 month.

Recipe:  Canadian Living

Tuesday, 19 July 2022

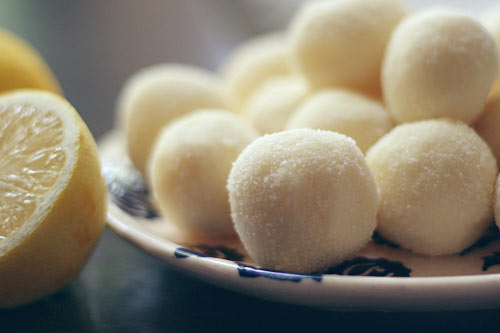
White Chocolate Lemon Truffles

Deliciously sweet and creamy with a pronounced lemon flavor. They have a melt-in-your-mouth texture, and the addition of the sugar coating gives a nice texture contrast. Wonderful for an edible homemade gift


1/3 cup plus 1 Tbsp. heavy cream
grated zest of 1 lemon
9 ounces good quality white chocolate, finely chopped
pinch of salt
1/4 cup (1/2 stick) unsalted butter, cut into thin slices
2 tsp. freshly-squeezed, strained lemon juice
granulated Sugar, for coating

  • In small, heavy, non-aluminum saucepan, combine the heavy cream and lemon zest.
  • Over low heat, heat until cream comes to a simmer, stirring occasionally.
  • Remove from heat, cover tightly and let sit for 20 minutes.
  • Combine the white chocolate, salt, and butter in medium heatproof bowl.
  • Remove the cover from the cream and reheat over low heat, stirring occasionally, until it reaches a simmer.
  • Remove from heat.
  • Strain through fine-meshed strainer into white chocolate mixture.
  • Press down on the lemon zest left in the strainer to extract all the liquid from it.
  • Place white chocolate mixture over a pot of warm water on low heat (water should not touch bottom of bowl).
  • Stir the chocolate frequently just until almost melted.
  • Remove the bowl from the warm pot.
  • Stir until the chocolate is melted and smooth.
  • *White chocolate can be difficult when melting. If there are small lumps of white chocolate use a food processor and process the mixture at high speed just until smooth
  • Stir in lemon juice.
  • Transfer the mixture to a small bowl.
  • Chill at least 4 hours, covering tightly when cold.
  • To make truffles: Using a small cookie scoop or a spoon, form balls of about 1 inch diameter from the cold truffle base.
  • Roll in sugar until well-coated.
  • Store truffles airtight in refrigerator for up to one week or freeze for longer storage.
  • To serve, remove from refrigerator 15 to 20 minutes prior to serving time.
  • Let stand at room temperature, covered, until serving time.